Camera controls
Camera controller and Camera rig
CameraController is the script that houses all camera movement logic enabling the camera to rotate, zoom and pan around the map.
CameraRig is a prefab found in Assets/Resource/EvacuAgent/Prefabs and consists of two parts:
- A
GameObjectwithCameraControllerattached to it. - A Camera that is a child of the
CameraControllerGameObject, which is positioned above and behind the parent object. The camera is set up this way so that theCameraControlleris the aspect of the hierarchy the logic moves, effectively dragging the camera with it.
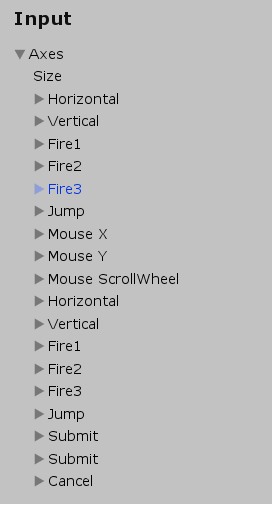
Axes in Unity
To access the current virtual axes mappings navigate to Edit -> Project settings -> Input manager.
In Unity virtual axes are used to allow multiple input devices such as keyboards or console controllers to share a common axis.
For example, the mouse Left click and controller Trigger could share a button for shooting a weapon.
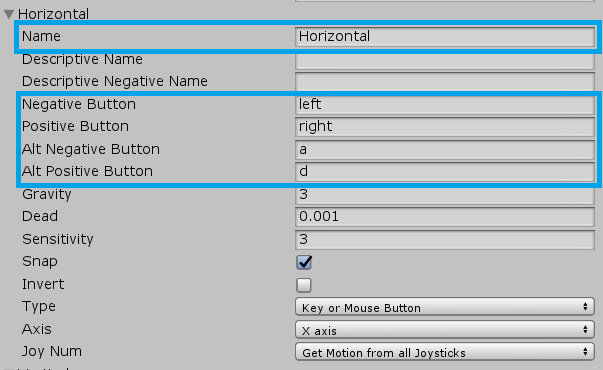
Each axis defines a number of properties, all of which can be retrieved or modified programmatically via their name, which declare a Positive and Negative field.
For example, the Vertical axis could store the Down arrow key in the Negative field and the Up arrow key in the Positive field.
Current axes mapping
Panning - Horizontal axis
Negative / Pan left:Left arrow key,A keyPositive / Pan Right:Right arrow key,D key
Panning - Vertical axis
Negative / Pan forward:Down arrow key,A keyPositive / Pan backwards:Up arrow key,D key
Rotation - Fire1
Negative / Rotate Anti-clockwise:Q keyPositive / Rotate Clockwise:E key
Zoom - Fire2
Negative / Zoom in:C keyPositive / Zom out:Z key
Increased pan speed - Fire3
Positive / Increase pan speed:Shift key
Adding or modifying camera controls
Unity declares many default axes as shown below.
To add a new camera control:
- Find an unused axis such as
Jump. - Enter the keys you wish to use in the positive and negative properties as shown in blue in the example below.
- In
CameraControllerdeclare a new field such as:private const string newAxisReference = "AxisNameInInputManager";. - Create a new method for your logic.
- Use a command similar to
float newAxisReference = Input.GetAxis(newAxisReference);, or another Input method to return data about the axis. - Use this data to manipulate the Transform of the
CameraControllerGameObject. - For modification follow the same steps but using an axis that is already mapped.
Example camera control
Below is the rotation logic for CameraController.
It first gets float data from the input, which returns a float below 0.0 if the Negative control for rotation is pressed or a float above 0.0 if the positive control for rotation is pressed.
A new Quaternion is then instantiated based on a rotation amount which is then applied to the Transform of the CameraController.
public void HandleCameraRotation()
{
    float rotationValue = Input.GetAxis(rotationAxis);

    // Rotate left
    if (rotationValue < buttonNotPressedValue)
    {
        newRotation *= Quaternion.Euler(Vector3.up * -rotationAmount);
    }
    // Rotate right
    if (rotationValue > buttonNotPressedValue)
    {
        newRotation *= Quaternion.Euler(Vector3.up * rotationAmount);
    }

    // For smoother rotation
    transform.rotation = Quaternion.Lerp(transform.rotation, newRotation, Time.deltaTime * movementTime);
}
Setting up a camera in a scene
- Drag and drop the
CameraRigprefab into the scene hierarchy. - Place the
CameraRigin the place you wish the camera to start when running the scene. - Ensure all other camera are either removed or disabled.
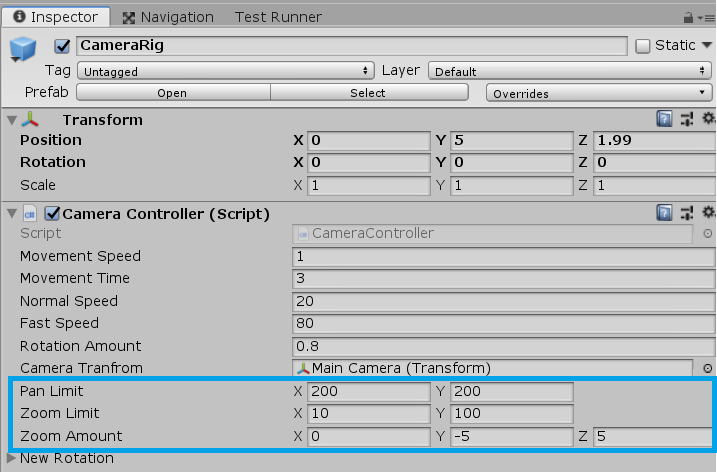
- Set the
CameraRigtransform limits, shown in blue below, to suit the current scene. Note that this may require trial and error or the placement of emptyGameObjecton the map to note their locations. Transform limits are coordinates on the map, not the limit from the initial camera location.
Recommended works
- Make camera bounds be set dynamically depending on map size to avoid the need to manually input the values for each new scene or scene modification.
Troubleshooting
If the CameraRig is not moving it likely means another Camera is in the scene.
Each scene will be created with one by default which needs to be removed or disabled.
- If the
CameraRigis not moving it likely means anotherCamerais in the scene. - Each scene will be created with one camera by default which needs to be removed or disabled.
- Junctions also currently have a camera attached, which needs to be disabled.